In the rapidly evolving landscape of artificial intelligence and machine learning, organizations continue to seek cost-effective solutions to reduce reliance on expensive third-party tools—not only for development but also for deployment. Recently I was tasked with deploying a predictive machine learning (ML) model at my organization. Our original goal was to bring the ML model in-house to reduce operational costs, but the deployment process presented significant challenges due to expensive infrastructure requirements.
Enter serverless computing, with platforms like AWS Lambda offering a compelling solution for lightweight and on-demand ML inference. The serverless approach is a particularly timely option given the rise in edge computing and machine learning use cases and the need to reduce the excessive costs traditionally associated with ML deployment.
In this article, I will walk you through two ways to deploy an ML model on AWS Lambda. AWS Lambda is a preferred choice because it is simple, automatically scalable, and cost-effective, as we only pay for the requests we make.
Why use AWS Lambda for ML model deployment?
AWS Lambda provides a compelling solution for model deployment that offers a true pay-as-you-go service model. Key advantages include
- Cost efficiency: For organizations processing between 1,000 to 10,000 predictions daily, serverless compute can potentially reduce infrastructure costs by up to 60% compared to maintaining dedicated prediction servers.
- Scalability: AWS Lambda automatically scales computational resources based on incoming prediction requests, without requiring manual intervention.
By eliminating the need for pre-provisioned server capacity, organizations can optimize resource utilization and significantly reduce infrastructure overhead.
While AWS Lambda excels in many scenarios, it is crucial to evaluate its limitations, including cold starts and resource constraints, to determine if it aligns with your specific ML deployment needs.
Approach #1: Deploying a model stored on Amazon S3
Deploying a ML model as a Python pickle file in an Amazon S3 bucket and using it through a Lambda API makes model deployment simple, scalable, and cost-effective. We set up AWS Lambda to load this model from S3 when needed, enabling quick predictions without requiring a dedicated server. When someone calls the API connected to the Lambda function, the model is fetched, run, and returns predictions based on the input data. This serverless setup ensures high availability, scales automatically, and saves costs because you only pay when the API is used.
Step 1. Create a zip archive for the Lambda layer
A Lambda layer is a zip archive that contains libraries, a custom runtime, and other dependencies. I will demonstrate the creation of a Lambda layer using two Python libraries, Pandas and Scikit-learn, that are often used in ML models. Below is the code for creating a Lambda layer zip archive, containing Pandas and Scikit-learn, using Docker. Create a file, name it createlayer.sh, and copy the code into it.
if [ "$1" != "" ] || [$# -gt 1]; then
echo "Creating layer compatible with python version $1"
docker run -v "$PWD":/var/task "lambci/lambda:build-python$1" /bin/sh -c "pip install -r requirements.txt -t python/lib/python$1/site-packages/; exit"
zip -r sklearn_pandas_layer.zip python > /dev/null
rm -r python
echo "Done creating layer!"
ls -lah sklearn_pandas_layer.zip
else
echo "Enter python version as argument - ./createlayer.sh 3.6"
Now, in the same directory, create a file named requirements.txt to store the names and versions of the libraries in the layer. In this case, our requirements.txt file will list the names and versions of the Pandas and Scikit-learn libraries we’re using.
pandas==0.23.4
scikit-learn==0.20.3
Next, in the terminal, navigate to the directory where you have placed the createlayer.sh and requirements.txt files and run the command below to generate the Lambda layer zip file.
./createlayer.sh 3.6
When the above shell command is executed, the pip install command included in the shell script will automatically download Pandas, Scikit-learn, and their dependencies from the Python Package Index (PyPI) and install them directly into the python/lib/python$1/site-packages/ directory. When the shell script completes, you will find that the generated Lambda layer zip file contains folders for Pandas, Scikit-learn, NumPy, and SciPy, along with some Python files.
Step 2. Store the ML model and Lambda layer files in Amazon S3
Create a new folder in an Amazon S3 bucket and give it the name of your Lambda function for deploying the ML model (such as DeployMlModel). Copy the Python pickle file for your ML model and the zip file for your Lamba layer to the new folder. After you have copied the files, your S3 bucket should show the folder and its contents as shown in Figure 1 below.
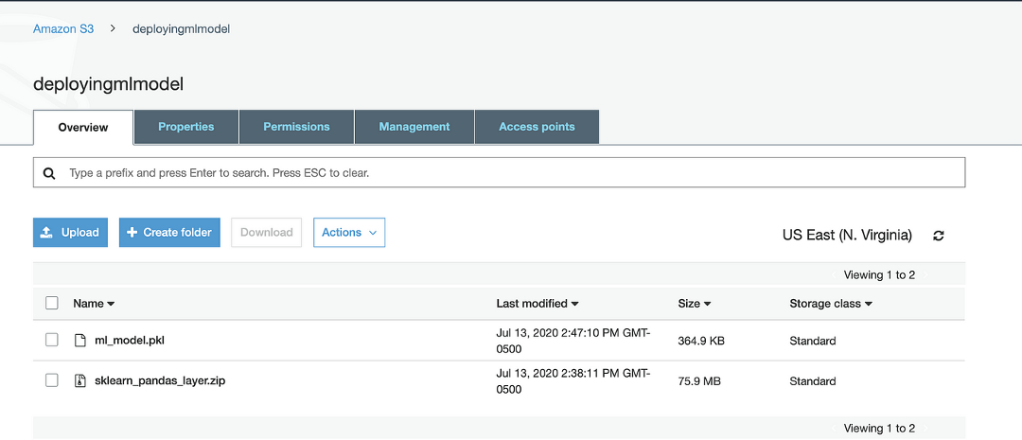
Figure 1
Foundry
Step 3. Create the Lambda function
- Go to the AWS Lambda console and click “Create function.”
- Choose “Author from scratch.”
- Enter the function name (e.g.,
DeployMlModel). - Choose the runtime (e.g., Python 3.6).
- Select or create an appropriate execution role with permission to read from Amazon S3.
- Click “Create function.”
At this point, you’ll have an empty Lambda function ready to be configured.
Step 4. Add the Lambda layer to the Lambda function
In this step we configure AWS Lambda to use the Lambda layer zip file we created and stored in S3 in Step 2. To add our Lambda layer zip file to AWS Lambda, we click “Layers,” then “Create Layer” in the AWS Lambda UI as shown in Figure 2 below.
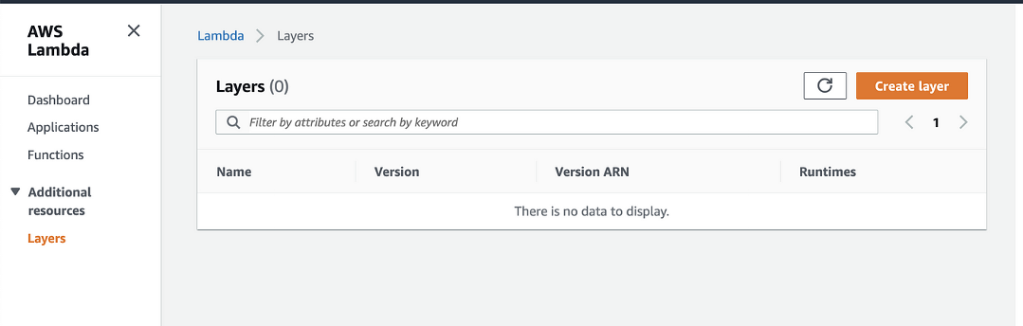
Figure 2
Foundry
Next, enter the name, description, S3 URL, and other properties of our Lambda layer as shown in Figure 3 below and click Save.
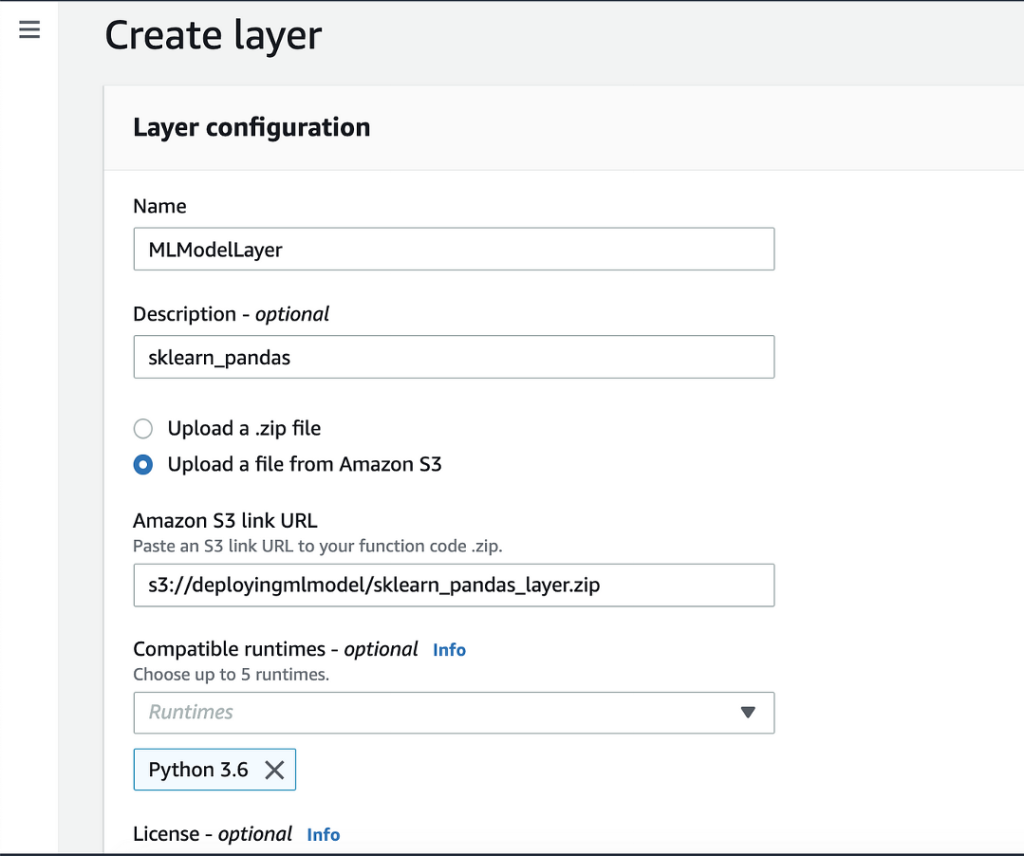
Figure 3
Foundry
Once the new Lambda layer is created, you should receive a “Successfully created layer” message at the top of the window as shown in Figure 4 below.

Figure 4
Foundry
Some key points about Lambda layers to keep in mind:
- Lambda layers must be zipped files.
- You can have at most five Lambda layers for a given Lambda function.
- The total unzipped size of the Lambda function and its layers cannot be bigger than 250MB.
Now, to add this layer to your Lambda function, go to the Lambda function that you created in Step 3, click on “Layers,” and choose the “Custom layers” option. See Figures 5 and 6 below for reference.
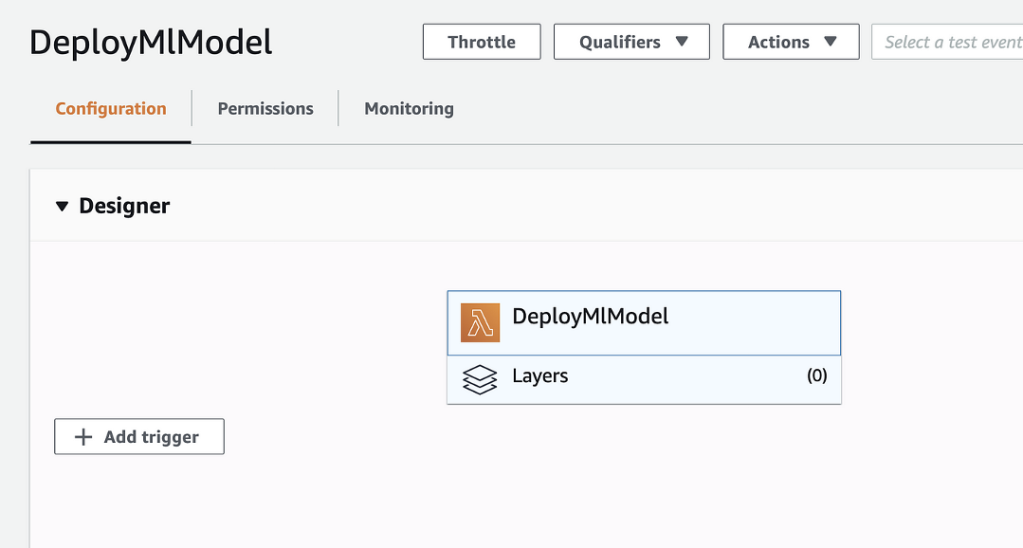
Figure 5
Foundry
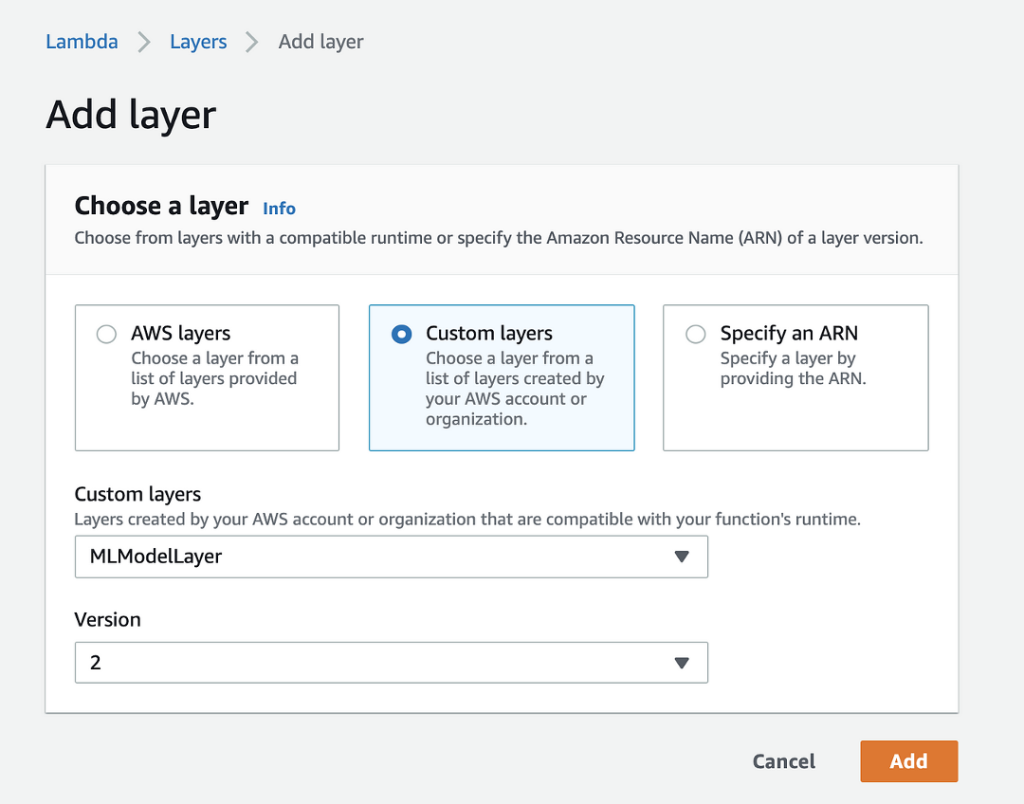
Figure 6
Foundry
In the “Custom layers” dropdown menus, select the name and version of the Lambda layer and click on “Add” to add it to the Lambda function.
Step 5. Add the Lambda function code
Next, we will add the Lambda function code that uses the ML model.
- In the AWS Lambda console, open the Lambda function (
DeployMlModel) you created in Step 3. - In the left-hand menu, click on “Code.”
- In the inline editor, replace the default content with the following code:
import json
import pickle
import sklearn
import boto3
import pathlib
import jsons3 = boto3.resource('s3')
filename = 'ml_model.pkl'
file = pathlib.Path('/tmp/'+filename)
if file.exists ():
    print ("File exist")
else :
    s3.Bucket('deployingmlmodel').download_file(filename, '/tmp/ml_model.pkl')
def lambda_handler(event, context):    model = pickle.load(open('/tmp/'+filename, 'rb'))
y    print("provide input here")
    #pred = model.predict(""provide input here"")
Your Lambda function now should include one layer and the code listed above. See Figure 7 below for reference.
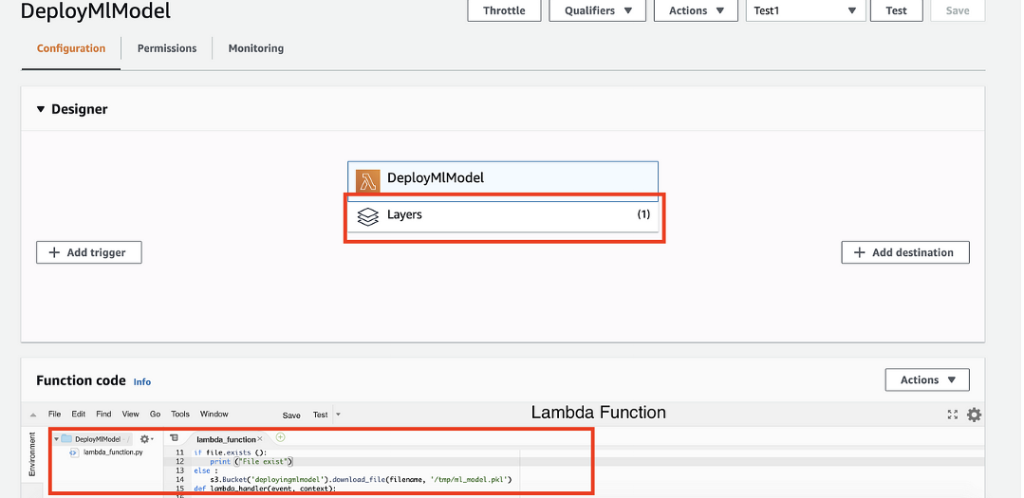
Figure 7
Foundry
Hurray! You have successfully deployed your ML model on AWS Lambda. To test your Lambda function, go to the “Test” tab in the AWS Lambda console. Create a new test event by clicking “Configure test event,” provide a simple JSON payload (i.e., an input your model expects), and click “Test.” The function should run, load the model from Amazon S3, and return the output in the console. This allows you to quickly validate that your deployment is working correctly and view the predictions generated by your ML model.
Approach #2: Packaging the model with the AWS Lambda deployment
This approach involves zipping the ML model pickle file together with the Lambda function and uploading the whole package directly to AWS Lambda. Save the Lambda function code in Step 5 above in a file named Predict.py and then zip it together with the ML model pickle file (e.g., ml_model.pkl) to create a zipped archive. See Figure 8 below for the contents of the zip archive.

Figure 8
Foundry
Now, upload this zipped file to AWS Lambda using the “Upload a .zip file” option highlighted in Figure 9 below.
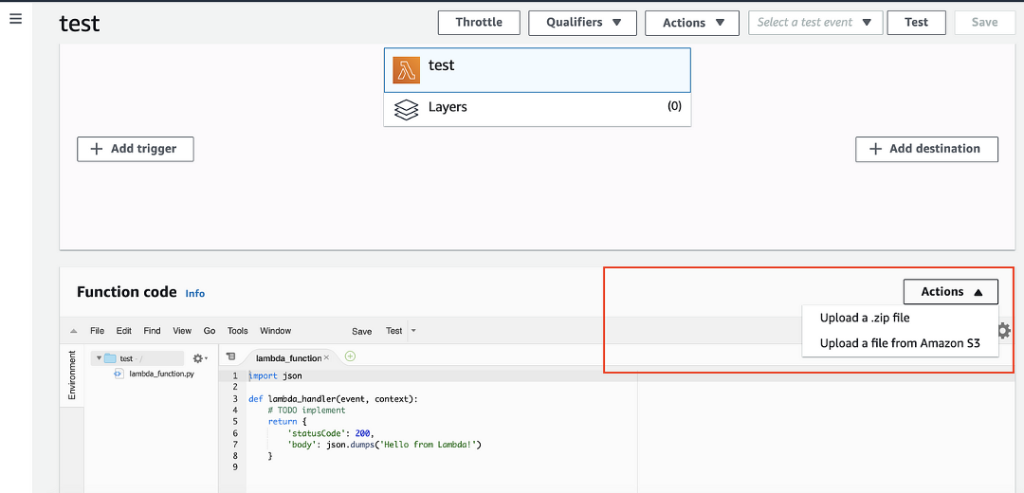
Figure 9
Foundry
If the size of your zip file is less than 10MB, you can upload it from here. Otherwise, first upload the zip file to Amazon S3 and use the “Upload a file from Amazon S3” option to add it to AWS Lambda from there. This instruction is displayed in small type in the “Upload a .zip file” window as shown in Figure 10 below.
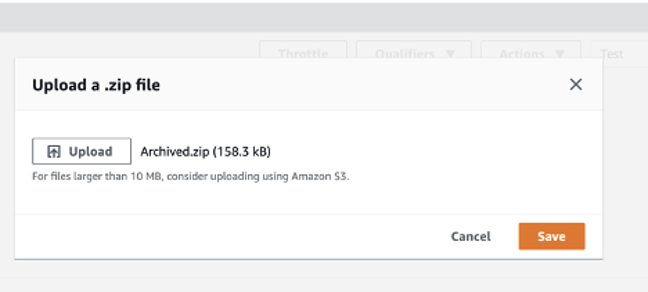
Figure 10
Foundry
Click Save. Once your file is uploaded successfully, view your Lambda function. It should show the .pkl file and the .py file in the archive folder as shown in Figure 11 below.
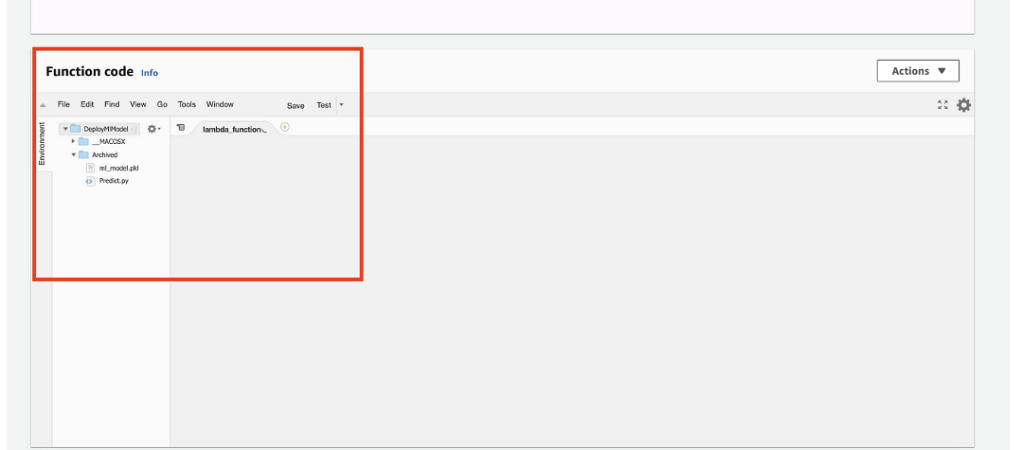
Figure 11
Foundry
Woohoo! You have successfully deployed the ML model in zip format along with the Lambda function code.
Real-world applications and limitations
Serverless ML deployment is particularly well-suited for low-volume, on-demand use cases, such as customer support chatbots, image recognition APIs, and other lightweight inference tasks at the edge, reducing reliance on central data centers.
TradeIndia.com, a B2B trade portal, uses AWS Lambda to run lightweight ML models for real-time customer data analysis. As a result of their serverless model deployment, they reduced infrastructure costs by 25% to 30%, enabling them to reinvest those savings into expanding their service offerings.
Of course, AWS Lambda also has limitations. For model deployment, the primary limitation is the 250MB package size restriction, which could pose a challenge for complex models. To address this constraint, developers can employ mitigation techniques such as model compression, selective feature engineering, and efficient dependency management. Modularizing model components and implementing hybrid architectures that blend serverless and traditional infrastructure can help overcome size limitations without sacrificing model performance.
Another challenge with AWS Lambda is cold starts, where initial function invocations can experience latency spikes of 10 to 12 seconds, contrasting sharply with the near-instantaneous responses of dedicated server environments. On the first invocation, Lambda must download the container image into its runtime environment, leading to additional response time. This latency is particularly noticeable in scenarios requiring low-latency responses.
To mitigate this, you can configure a CloudWatch-triggered Lambda event to periodically invoke the Lambda function, keeping it “warm” and ready for execution, reducing delays. Additionally, this configuration can be optimized to run only during specific time windows, such as business hours, to balance performance and cost. This approach ensures the ML model remains available without introducing unnecessary runtime costs.
In conclusion, deploying an ML model using AWS Lambda provides a scalable, cost-effective solution that eliminates the need for expensive licensing and deployment tools. The two approaches discussed—reading the ML model from an Amazon S3 bucket, and zipping the model together with the Lambda function code—provide some flexibility in addressing different deployment scenarios.
While the AWS Lambda architecture is efficient, addressing the cold start latency with techniques like warming up the Lambda function will help you ensure optimal performance, even for the first API call. By combining cost efficiency and performance optimization, this deployment method for ML models stands out as a practical choice for organizations aiming to maximize value and reduce expenses.
Read more here: https://www.infoworld.com/article/4064124/how-to-deploy-machine-learning-models-with-aws-lambda.html


