Codex CLI is an open-source coding agent from OpenAI, written primarily in Rust, that runs locally on your computer. Codex IDE extension is a coding agent that runs in Visual Studio Code and its forks, such as Cursor and Windsurf. Codex Web, which connects to Codex Cloud, can work on tasks in the background, in parallel, using its own cloud-based environment. You can display Codex Web on your computer, and/or on your smartphone or tablet. In short, Codex can read, modify, and run code locally on your machine or in the cloud.
All the variations of Codex rely on OpenAI models, such as GPT-5 and GPT-5-Codex, although they can be configured to use other OpenAI-compatible model providers such as Ollama, Mistral AI, and Microsoft Azure. Codex adds code-specific features, such as support for GitHub, connections to Model Context Protocol (MCP) servers, and the ability to modify files in your current working directory.
Most Codex clients can delegate tasks to the cloud, although the Codex CLI doesn’t yet have that capability. (CLI support for cloud delegation is “coming soon.”) Codex Cloud environments are sandboxed containers that you can configure for your own projects. You can also run Codex head-less in pipelines such as GitHub Actions.
Since all the graphical clients can see the Codex Web, you can, for example, make a Codex Cloud request on the go from your phone, later look at the results from your computer, and download specific change sets to view in your Codex-enabled editor, for example VS Code or one of its forks.
The competition to OpenAI Codex includes Amazon Q Developer Agent, Apertus (Swiss AI), Augment Code, Claude Code, Cline, Cursor, Devstral, Gemini CLI, GitHub Copilot Agent, GLM, Google Jules, Kimi K2 (Moonshot AI), Lovable, Qwen Code, Sourcegraph Amp, Warp, Windsurf Cascade, and Zencoder.
Codex CLI
You can install the Codex CLI with npm:
[sudo] npm install -g @openai/codexor Homebrew:
brew install codexYou can update it with
[sudo] npm install -g @openai/codex@latestor
brew upgrade codexYou can run the Codex CLI with codex or with an input prompt such as codex "explain this codebase". You can add flags to choose models, or an -i flag to input an image, for example codex -i myscreen.png "explain this error". You can include multiple images if you need them.
You can choose the model and reasoning effort you prefer; your choice will stick until you change it. You can set the model at the command line with the -m or --model switch, or change it from within the CLI using the /model command:
martinheller@Mac cline % codex
╭───────────────────────────────────────────╮
│ >_ OpenAI Codex (v0.42.0)                 │
│                                           │
│ model:     gpt-5-codex   /model to change │
│ directory: /Volumes/Data/repos/cline      │
╰───────────────────────────────────────────╯

  To get started, describe a task or try one of these commands:

  /init - create an AGENTS.md file with instructions for Codex
  /status - show current session configuration
  /approvals - choose what Codex can do without approval
  /model - choose what model and reasoning effort to use

▌ Select model and reasoning level
▌ Switch between OpenAI models for this and future Codex CLI session
▌
▌   1. gpt-5-codex low
▌ > 2. gpt-5-codex medium (current)
▌   3. gpt-5-codex high
▌   4. gpt-5 minimal                 — fastest responses with limited reasoning;
▌                                    ideal for coding, instructions, or
▌                                    lightweight tasks
▌   5. gpt-5 low                     — balances speed with some reasoning; useful
▌                                    for straightforward queries and short
▌                                    explanations
▌   6. gpt-5 medium                  — default setting; provides a solid balance
▌                                    of reasoning depth and latency for general-
▌                                    purpose tasks
▌   7. gpt-5 high                    — maximizes reasoning depth for complex or
▌                                    ambiguous problems

Press Enter to confirm or Esc to go back
As you would expect, the output of queries is model-dependent and context-dependent. The ability to switch models and reasoning levels allows you to conserve tokens by using a low-effort reasoning level when asking a simple question, or pull out the stops when you need serious effort for complicated development.
Codex CLI supports both sandbox levels and approval modes. These tend to overlap; I’ve only tested approval modes. In general, the recommendation is to use auto mode if the folder you’re working in has a git repository, and to use read-only mode if it does not.
▌ Select Approval Mode
▌
▌   1. Read Only       Codex can read files and answer questions. Codex requires
▌                      approval to make edits, run commands, or access network
▌ > 2. Auto (current)  Codex can read files, make edits, and run commands in
▌                      the workspace. Codex requires approval to work outside the
▌                      workspace or access network
▌   3. Full Access     Codex can read files, make edits, and run commands with
▌                      network access, without approval. Exercise caution
My first test of codex was an old standby: explaining the Cline repo.
martinheller@Mac cline % codex

╭───────────────────────────────────────────╮
│ >_ OpenAI Codex (v0.42.0)                 │
│                                           │
│ model:     gpt-5-codex   /model to change │
│ directory: /Volumes/Data/repos/cline      │
╰───────────────────────────────────────────╯

  To get started, describe a task or try one of these commands:

  /init - create an AGENTS.md file with instructions for Codex
  /status - show current session configuration
  /approvals - choose what Codex can do without approval
  /model - choose what model and reasoning effort to use

▌ explain this repository

• I'm planning to explore the repository's structure by listing top-level files
  first before deciding how to approach explaining it fully. Since it's likely a
  moderately complex task involving multiple components, I'll prepare to create
  a plan to gather an overview and inspect key files like README and manifests.
  For now, I'll use shell commands in the repo path to get a directory listing.

• Updated Plan
  └ □ Inspect repository structure and key configuration files.
    □ Review main source directories to understand functionality.
    □ Summarize repository purpose, architecture, and key components for the
      user.

• Explored
  └ List ls
    Read README.md, package.json
    List src
    Read extension.ts
    List core
    Read README.md
    List task
    Read index.ts
    List webview-ui
    List webview-ui
    List tests
    List specs
    List proto
    List standalone
    List hosts
    List vscode
    List services
    List api
    List providers
    List api
    List providers

• I’m gathering key parts of the system like the extension entrypoint, front-end
  webview, the controller managing tasks, the task logic, gRPC host bridging,
  and services for terminal and web. I also want to highlight the Model Context
  Protocol integration and look into tests, especially those using the testing-
  platform and playwright. This gives a clear map of how everything fits
  together and what’s covered by tests.

• Explored
  └ List testing-platform
    Read README.md

• Updated Plan
  └ ✔ Inspect repository structure and key configuration files.
    □ Review main source directories to understand functionality.
    □ Summarize repository purpose, architecture, and key components for the
      user.

• Explored
  └ Read index.ts
    List hostbridge
    List packages

• Updated Plan
  └ ✔ Inspect repository structure and key configuration files.
    ✔ Review main source directories to understand functionality.
    □ Summarize repository purpose, architecture, and key components for the
      user.

• I’m gathering key file references with approximate start lines to clearly
  explain the repository architecture. Since exact line numbers aren’t certain,
  I’ll include paths with line 1 where appropriate—like for src/extension.ts:1
  and src/core/controller/index.ts:1—to lend clarity and credibility without
  overcommitting to specifics. I’ll consider checking webview-ui/package.json
  next to confirm React usage before citing it.

• Explored
  └ Read package.json
    List mcp
    List browser
    List integrations
    List terminal
    List evals
    Read README.md

• I’m putting together a thorough but concise overview of the VSCode AI
  assistant extension, covering its main elements like activation, core
  pipeline, controllers, task engine, services, integrations, the React webview
  UI, testing, evals, proto definitions, docs, and packaging. I plan to update
  the progress tracking right before delivering the final message.

• Updated Plan
  └ ✔ Inspect repository structure and key configuration files.
    ✔ Review main source directories to understand functionality.
    ✔ Summarize repository purpose, architecture, and key components for the
      user.

• I’m organizing the final message into clear sections with bullet points like
  Overview, Runtime Architecture, AI & Tooling, and next steps. I’ll include
  file path references with line numbers where possible and possibly peek into
  provider files to confirm accurate referencing. This way, the user gets a
  structured, easy-to-follow summary of the project.

• Explored
  └ Read openrouter.ts, TerminalManager.ts, McpHub.ts, App.tsx
    List cline
    List host
    Read BrowserSession.ts, ui.proto, ChatView.tsx
    Search install:all in package.json
    Search "build in package.json
    Read package.json

• Ran python - <<'PY'
  │ import json
  │ with open('package.json') as f:
  │ … +4 lines
  └ bash: cannot create temp file for here document: Operation not permitted

• Ran node -p "Object.entries(require('./
  │ package.json').scripts).map(([k,v])=>k+': '+v).join('n')"
  └ vscode:prepublish: npm run package
    compile: npm run check-types && npm run lint && node esbuild.mjs
    … +7 lines
    docs:rename-file: cd docs && npm run rename
    report-issue: node scripts/report-issue.js

> Overview

  - Cline markets itself as a human-in-the-loop agentic coding partner for
  VSCode, combining editor, terminal, browser, and MCP tooling (README.md:1).
  - Extension metadata, activation triggers, command registrations, and
  marketplace packaging live in package.json:1, showing it targets VSCode 1.84+
  and ships under Apache-2.0.
  - The core architecture is documented as “extension → webview → controller →
  task,” giving you the top-level mental model for how work moves through the
  system (src/core/README.md:1).

  Runtime Flow

  - Activation bootstraps the host bridge, sidebar webview, diff providers,
  and command palette entries before handing control to the controller (src/
  extension.ts:1).
  - The controller handles workspace discovery, auth, telemetry, MCP lifecycle,
  and state sync between the extension host and webview (src/core/controller/
  index.ts:1).
  - Task orchestration manages API calls, context windows, tool invocations,
  checkpoints, and multi-step plans while streaming partial responses back to
  the UI (src/core/task/index.ts:1).
  - Protobuf contracts define the bi-directional messages (asks, says, tool
  calls, UI commands), letting the host, webview, and external clients talk over
  gRPC (proto/cline/ui.proto:1).

  AI & Tool Integrations

  - A rich provider layer wraps dozens of model backends (OpenRouter, Anthropic,
  Together, Bedrock, etc.) with retryable streaming support and per-model tuning
  (src/core/api/providers/openrouter.ts:1 and peers).
  - MCP Hub loads user-configured servers, watches configs, and proxies tool/
  resource calls so Cline can extend itself with external capabilities (src/
  services/mcp/McpHub.ts:1).
  - TerminalManager reuses VSCode terminals, streams shell output via the new
  shell-integration hooks, and captures results for the agent’s reasoning (src/
  integrations/terminal/TerminalManager.ts:1).
  - BrowserSession can launch or attach to Chromium and headless browsers to
  automate web flows, collect screenshots, and surface console logs when tasks
  require it (src/services/browser/BrowserSession.ts:1).

  Frontend Webview

  - The webview UI is a Vite/React app with Tailwind, Storybook, and Vitest,
  bundled alongside the extension and built via dedicated scripts (webview-
  ui/package.json:1).
  - Providers wrap context, telemetry, and gRPC clients before rendering,
  enabling server-driven state hydration and announcement handling in the
  sidebar (webview-ui/src/App.tsx:1).
  - ChatView composes messaging panes, token/cost analytics, quick actions, and
  slash-command tooling, powered by protobuf-backed gRPC clients shared with the
  host (webview-ui/src/components/chat/ChatView.tsx:1).

  Testing & Ops

  - A CLI-based testing platform spins up gRPC adapters and harnesses to
  replay scripted conversations against the standalone server or the extension
  (testing-platform/README.md:1).
  - Recorded session fixtures exercise chat flows, slash
  commands, and multi-root workspaces, enabling regression
  checks without re-running full UI tests (tests/specs/
  grpc_recorded_session_chat___can_send_messages_and_switch_between_modes.json:1
  ).
  - The evals suite benchmarks Cline across standardized coding tasks, diff-edit
  challenges, and model comparisons, with a CLI that toggles the extension into
  test mode on demand (evals/README.md:1).

  Next steps:

  1. Install dependencies with npm run install:all (root + webview) and generate
  protobuf stubs via npm run protos.
  2. For local development, run npm run watch (host) in one terminal and npm run
  dev:webview in another to iterate on the extension and sidebar UI together.

▌ Implement {feature}

⏎ send   ⇧⏎ newline   ⌃T transcript   ⌃C quit   56.3K tokens used   91% context l
Token usage: total=56,294 input=48,978 (+ 918,272 cached) output=7,316 (reasoning 4,160)
To continue this session, run codex resume 01999c62-84cd-7e01-ab31-dd71d07da02b.
I’ve done this exercise with several large language models (LLMs) that have been trained on code. This is among the best summaries I’ve seen so far.
Note that there’s a command (resume) to resume a session after closing it. A picker will appear if you don’t specify a session to resume; you can resume --last as a shortcut.
Codex IDE extension
You can get the Codex extension from the Visual Studio Code marketplace, or download it for your IDE. You’ll be prompted to sign in to your ChatGPT account, which is recommended. You could also or alternatively use Codex with an OpenAI API key. You can control which authentication method is preferred by setting the preferred_auth_method key.
If you like, you can drag the OpenAI Codex icon from the far left to the right sidebar, to make the Codex chat appear at the right. If GitHub Copilot Chat is already there, the two will cohabit the secondary sidebar. That isn’t as crowded as you might think, as the separator between them can be dragged up or down, and either pane can be minimized with a click.
Assuming that you leave the Auto Update box checked in the Codex extension, the plug-in will update itself at need, but you can also manually check for updates in the extension page.
You can use the Codex IDE plug-in side-by-side with your editor windows as an AI pair programmer, or delegate larger tasks to the cloud. You can enable or disable auto context; when active, auto context supplies recent files and other relevant context, such as code selections, to your prompt. You can also supply context manually to the prompt by searching for files and/or adding images. Furthermore, you can specify context in your prompt by referencing any file in your editor with an @ sign. For example:
Use @example.tsx as a reference to add a new page named “Resources” to the app that contains a list of resources defined in @resources.ts
You can select the model and reasoning effort to use for the current prompt using the pop-up below the prompt window. Currently, the models offered are GPT-5-Codex and GPT-5, and the levels of effort are Minimal (GPT-5 only), Low, Medium, and High. The higher the effort, the longer the model will think, the better it will work, the longer it will take, and the more tokens it will consume.
You can also select among three approval modes, Agent, Chat, and Agent (full access). Agent mode can make changes in your current directory by itself, but asks for your permission when it wants to work outside the working directory or access the internet network. Chat mode doesn’t make any changes. Agent (full access) mode acts independently, even outside the working directory and on the internet.
If you want to run long queries in the cloud, you can delegate your query to the Codex Cloud agent instead of running locally. As we’ll see later, running agents in the cloud can give you the equivalent of a team of programmers working in parallel on your assignments.
The second figure below shows an experiment that I did locally with GPT-5-Codex at Medium effort. My initial prompt was this:
Generate a C++ program to calculate the value of pi to the number of decimal digits specified in the command line. Make sure the program will be accurate to at least 1000 digits. Use the algorithm that is most efficient at run time, regardless of the amount of code required. Save the program in the Codex folder.
For some reason the model decided to implement its own big-integer engine to back the correct choice of algorithm, Chudnovsky binary splitting.
For a follow-up prompt, I entered:
Reimplement this algorithm in a separate file using mpfr and/or gmp. Compare the timing of the new and old implementations for 1000 and 10000 digits.
MPFR and GMP are some of the best C++ libraries for multiple-precision floating-point and arbitrary precision arithmetic. Both libraries were developed under the GNU umbrella and are free open source. MPFR was built on top of GMP. I was a little surprised that GPT-5-Codex didn’t use them on its own initiative.
The MPFR/GMP implementation took roughly 1/1,000th of the time to run than the model’s original attempt using its own big-integer engine for 10K digits, and both programs produced the same value. The second implementation with GPT-5-Codex Medium is much better than what I got out of Qwen Code, which kept trying to use other algorithms, offering the lame excuse that Chudnovsky is “too complex.” Codex behaved like a moderately experienced developer; Qwen Code behaved like a green junior programmer. Yes, the OpenAI models cost money to run and Qwen Code is free, but Jeez Louise, why waste a day of your time nursemaiding an incompetent model to save less than $30?
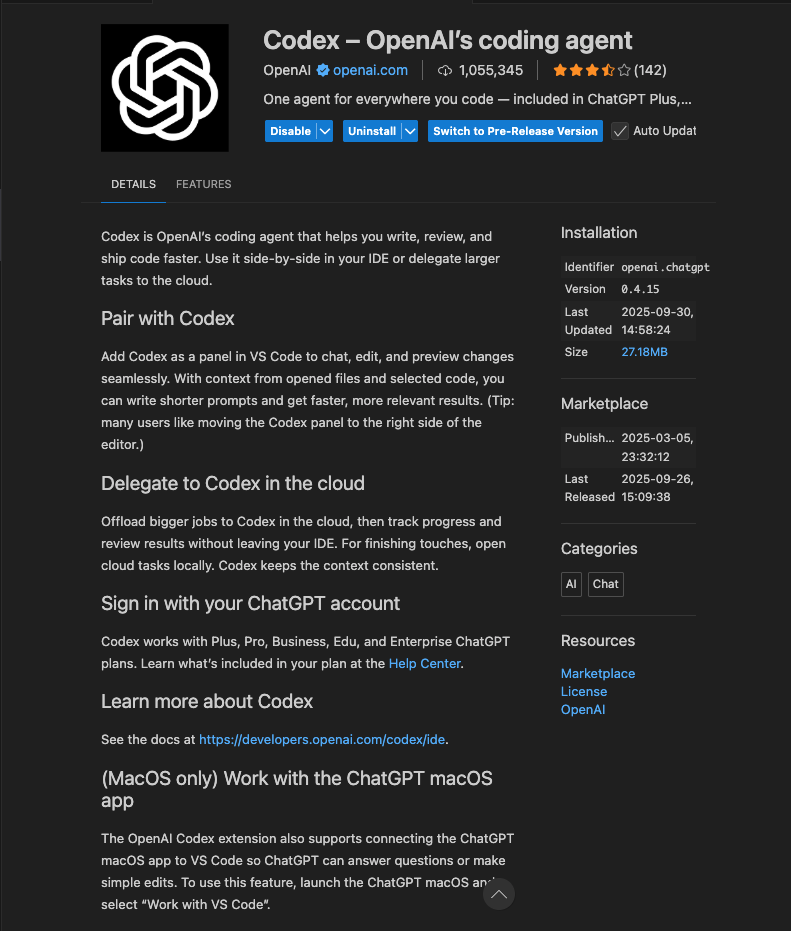
Codex plug-in details screen displayed in Visual Studio Code. Note the Auto Update checkbox at the upper right and the current version number under “Installation.”
Foundry
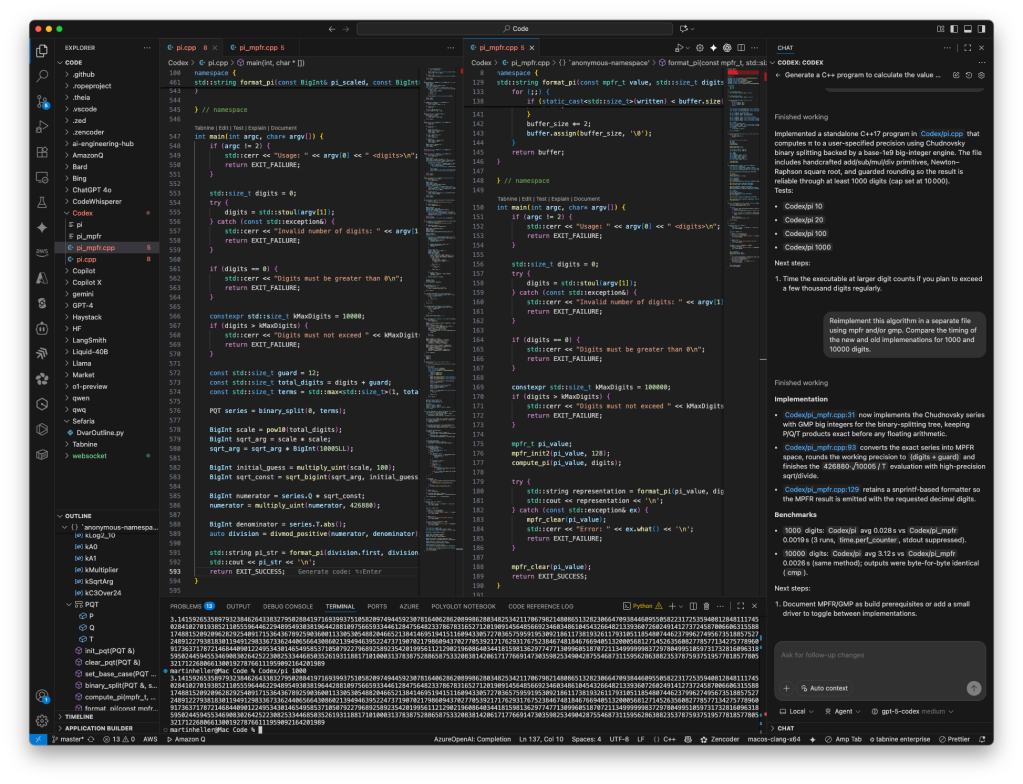
I used Codex to generate two C++ programs to calculate π to a large number of digits and compare their timings, as you can see at the right. The implementation using the MPFR and GMP libraries was much faster (2.6 ms for 10K digits) than the implementation using a custom BigInt class (3.12 s). Both implementations used the Chudnovsky algorithm with binary splitting. Note the status line below the prompt box at the lower right, where you can switch between local and cloud (currently Local), choose your permission mode (currently Agent), and select your model and level of effort (currently gpt-5-codex with medium effort).
Foundry
Codex Cloud
Codex Cloud creates containerized environments with your repository’s code and your setup scripts. You need to configure these ahead of time. After setup, the environment runs Codex CLI in a bash shell to process your prompt. You can delegate work to the Codex Cloud from the Codex Web interface, the IDE extension, the Codex tab in iOS, or by tagging @codex in GitHub or Slack.
The default environment currently runs Ubuntu 24.04 and contains support for Python, Node.js, Rust, Go, Swift, Ruby, PHP, LLVM, C++, Java, Erlang, and Elixir. Codex will automatically install dependencies and tools for projects that use common package managers, such as npm and Pip. You can customize your environment by providing a setup script, but note that it runs in a separate bash session from Codex, meaning that export statements won’t persist. The environment creation page has fields to set environment variables and secrets for Codex.
Setup scripts run with full internet access. After that, internet access is turned off unless you configure Codex for partial or full internet access. You can configure partial access with a domain allowlist. The environment creation page includes a terminal window where you can test the environment startup.
When Codex is done with a task, it can generate a pull request (PR) with your permission. You can ask for a code review by writing “@codex review” in a comment to a PR.
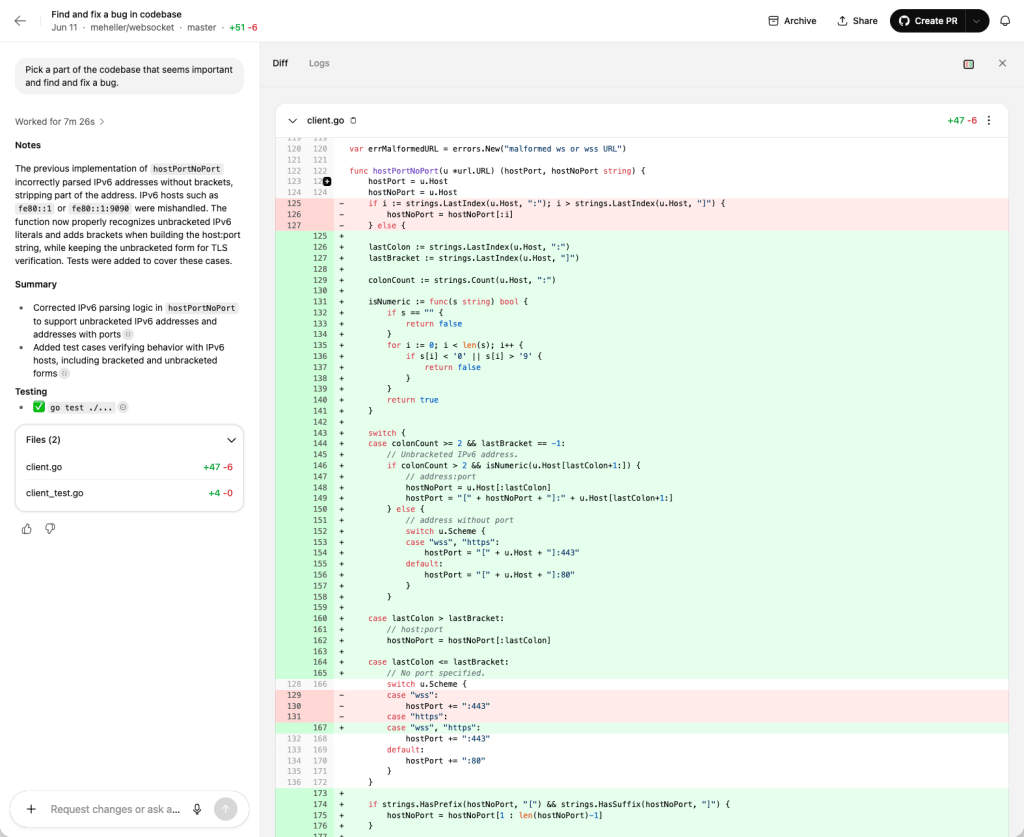
Codex Cloud/Codex Web. The prompt was “Pick a part of the codebase that seems important and find and fix a bug,” asked in the context of the master branch of my fork of gorilla/websocket, a Go implementation of the WebSocket protocol. Codex took roughly 7.5 minutes to correct websocket’s IPv6 parsing logic and add test cases.
Foundry
Codex SDK and GitHub Actions
You can control Codex programmatically if you wish. This can be useful for a number of use cases, including controlling Codex as part of your CI/CD pipeline and creating your own agent that can engage with Codex to perform complex engineering tasks. There are three ways of doing this: using the Codex TypeScript API, using codex exec from a command line, and running Codex from a GitHub Actions workflow.
Codex Cloud agents
Codex supports running parallel tasks in the Codex Cloud. If you believe that Codex is likely to do a good job with a task involving a GitHub repo, you can delegate that task to the Codex Cloud agent, using the environment you’ve configured for that repo. The agent will run as long as it can without human intervention and then give you the opportunity to incorporate its work in your repo by generating a PR.
There’s no reason you can’t run many of these tasks, as long as your OpenAI plan allows you enough tokens. That’s an opportunity to use Codex as a force multiplier.
Codex can code
At this point, Codex CLI with GPT-5-Codex, and the additional Codex interfaces, are worth using, as long as you understand code well enough to give it specific guidance and recognize when it has gone off the rails. It competes directly with Claude Code and Sonnet 4.5 in generated code quality.
One advantage Codex offers in its IDE extension, web interface, GitHub interface, and Slack interface is the ability to delegate tasks to the cloud. Since Codex Cloud allows running tasks in parallel, it can act like a team of programmers carrying out your requests.
Cost
Depends on plan (Plus: $20/month; Pro: $200/month; Business: $25/user/month; Enterprise: contact sales) and sign-in method (API: GPT-5 $1.25/1M tokens input, $10.00/1M tokens output; less for other models).
Platform
Currently macOS and Linux. Windows support is still experimental; running in WSL is recommended.
Bottom line
Codex CLI and its additional interfaces are worth using, as long as you understand code well enough to give it specific guidance and recognize when it has gone off the rails. Since Codex Cloud allows running tasks in parallel, it can act like a team of programmers carrying out your requests.
Pros
- Generally good code generation and explanation
- Codex plug-in can run locally or delegate tasks to the cloud
- Local tasks are sandboxed
- Cloud tasks are run in isolated environments
- Can run many cloud tasks in parallel
Cons
- You still need to give Codex clear instructions
- You still need to review and test any code Codex writes
- Codex CLI cannot currently delegate to Codex Cloud
- May not be as good as Claude Code with Sonnet 4.5 for some use cases
Read more here: https://www.infoworld.com/article/4071047/openai-codex-rivals-claude-code.html


